Wednesday, February 5, 2014

Snowflake Afghan


                                   Snowflake Afghan

Materials: 32 oz. dark, 28 oz. light worsted-weight yarn. G hook (4.25 mm)
Stitches: U.S. terminology
   ch = chain     sc = single crochet     dc = double crochet     trc = triple crochet
   hdc = half double crochet     sl = slip     st(s) = stitch(es)     sp(s) = space(es)
   rnd = round     beg = beginning
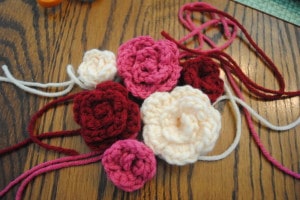
Hexagon (make 59)
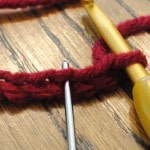
Rnd 1: With light color ch 2, 6 sc in second chain from hook, sl st in beg sc.
Rnd 2: Ch 5 (counts as dc and ch 2), dc in first sc, *(dc, ch 2, dc) in next sc, repeat from * 4 times; sl st in 3rd ch of ch-5.
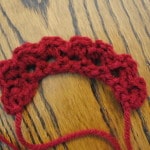
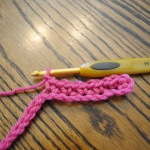
Rnd 3: Sl st to ch-2 sp, ch 3 (counts as first dc on this and following rnds), (dc, ch 3, 2 dc) in first ch-2 sp, *(2 dc, ch 3, 2 dc) in next ch-2 sp, repeat from * 4 times; sl st in top of ch-3.
Rnd 4: Sl st in each st to ch-3 sp, (ch 3, 2 dc, ch 3, 3 dc, ch 1) in first ch-3 sp, *(3 dc, ch 3, 3 dc, ch 1) in next ch-3 sp, repeat from * 4 times; sl st in top of ch-3.
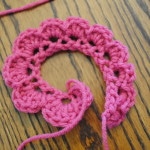
Rnd 5: Sl st in each st to ch-3 sp, (ch 3, 3 dc, ch 2, 4 dc, ch 3) in first ch-3 sp, *(4 dc, ch 2, 4 dc, ch 3) in next ch-3 sp, repeat from * 4 times; sl st in top of ch-3. Cut yarn and fasten. [6 pointed snowflake]

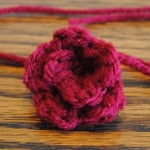
Rnd 6: Join dark colored yarn by making a slip knot on hook and joining with an sc in ch-2 sp, (ch 1, sc) in same sp, *working in sps between dc, hdc in each of next 2 sps, dc in next sp, 2 dc in next ch-3 sp, trc in ch-1 sp on rnd 4 (below), 2 dc in same ch-3 sp on rnd 5, dc in next sp (between dc), hdc in each of next 2 sps, (sc, ch 1, sc) in next ch-2 sp, repeat from * 4 times; working in sps between dc, hdc in each of next 2 sps, dc in next sp, 2 dc in next ch-3 sp, trc in ch-1 sp on rnd 4 (below), 2 dc in same ch-3 sp on rnd 5, dc in next sp (between dc), hdc in each of next 2 sps, sl st in beg sc.
Rnd 7: Ch 3 (first dc), *(dc, ch 3, dc) in ch-1 sp, dc in each of next 13 sts, repeat from * 4 times; (dc, ch 3, dc) in last ch-1 sp, dc in each of next 12 sts, sl st in top of ch-3.
Rnd 8: Ch 1, sc in first st, sc in next st, *3 sc in ch-3 sp, sc in each of next 15 sts, repeat from * 4 times; 3 sc in last ch-3 sp, sc in each of next 13 sts, sl st in beg sc. Cut yarn and fasten.

Assembly
Using dark color, whipstitch hexagons together forming 5 strips of 7 hexagons each and 4 strips of 6 hexagons each. Whipstitch strips together (7,6,7,6,7,6,7,6,7).
Edging
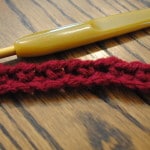
Row 1: With right side facing join light color with an sc, sc in each st around; sl st in beg sc, ch 1 and turn.
Row 2: Sc in first st, *trc in next st, sc in next st, repeat from * around; sl st in beg sc. Cut yarn and fasten.
Finishing: Weave in all loose ends.

Copyright 2001 by Art of Tangle

Tuesday, February 4, 2014

Heart Granny Square Crochet Pattern by Kara

Heart Granny Square Crochet Pattern

heart granny square crochet pattern

I’m a sucker for granny squares and can’t seem to stay away from them for very long. There is something about the this timeless and classic square that just draws me in. I thought it would be fun to have a heart granny square to include in some of my Valentine’s crafts. I worked up a bunch and finally got it the way I like. Here is my heart granny square crochet pattern to share with you all …

Heart Granny Square Crochet Pattern

heart granny square crochet pattern
Here’s what you need:
  • 2 colors worsted weight yarn
  • H hook
  • tapestry needle, scissors
Click here to reference the Crochet Abbreviations Chart.
Finished size: approx. 4½ in.

With color A, make a magic ring.
Round 1: Ch 2 (counts as hdc), working into the ring, work 3 hdc, 3 dc, ch 1, Sl st in ring, ch 1, continue working in ring 3 dc, 3 hdc, join — 14 sts (not counting chains).
Round 2: Ch 2 (counts as hdc), work 1 hdc in each of the next 3 sts, 1 dc in next, 2 dc in next, 3 dc in next, ch 1, Sl st in Sl st from previous round, ch 1, 3 dc in next st, 2 dc in next, 1 dc in next, 1 hdc in each of the next 3 sts, join — 20 sts (not counting chains).
Round 3: Working in front loops only, Sl st in each st around, join and fasten off — 20 sts.
Round 4: Join Color B in back loop of the first st after join, ch 2 (counts as hdc), working in back loops only this round, work [1 dc, ch 3, 1 dc] in next st (1st corner made), 1 hdc in next st, ch 2, skip next 2 sts, 1 hdc in next st, [1 hdc, ch 3, 1 hdc] in next st (2nd corner made), 1 hdc in next, ch 2, skip next 2 sts (as well as the Sl st between them), 1 hdc in next, [1 hdc, ch 3, 1 hdc] in next st (3rd corner made), 1 hdc in next, ch 2, skip next 2 sts, 1 hdc in next st, [1 dc, ch 3, 1 dc] in next st (last corner made), 1 hdc in next st, ch 2, join in top of beg ch — 16 sts and 8 ch-sps.
Round 5: Sl st in next st and in ch-sp, ch 3 (counts as dc), work [2 dc, ch 3, 3 dc] in same ch-sp, ch 2, 3 dc in next ch-sp, ch 2, *[3dc, ch3, 3 dc] in next ch-sp, ch 2, 3 dc in next ch-sp, ch 2, rep from *twice more,  join in top of beg ch — 36 sts and 12 ch-sps.
Round 6: ch 1 (d0es not count as st), work 1 sc in same st as join and each of the next 2 sts, 3 sc in ch-sp, 1 sc in each of next 3 sts, 2 sc in ch-sp, 1 sc in each of next 3 sts, 2 sc in ch-sp, *1 sc in next 3 sts, 3 sc in ch-sp, 1 sc in next 3 sts, 2 sc in ch-sp, 1 sc in each of next 3 sts, 2 sc in ch-sp, rep from *twice more,  join — 64 sts.
Fasten off and weave in ends. Block to shape if desired.
blocking granny squares

Free Spring Crochet Flower Pattern Rosettes

Free Spring Crochet Flower Pattern Rosettes

by LORENE on JANUARY 29, 2013
Free Spring Crochet Flower Pattern
Rosettes
I created this sweet rosettes as embellishments for my Red Heart Spring Cloche.  I wanted something that had the same look but in different sizes.  They were the perfect addition to mySpring Blossom flower pattern.
Little Rosette
little rosette free pattern
Abbreviations and Stitches used:
st- stitch
sp- space
sl st- slip stitch
insert hook, yarn over, pull through, (two loops on hook), pull loop closest to hook through other loop
ch- chain
sc- single crochet
insert hook, yarn over, pull through (two loops on hook), yarn over, pull through both loops
hdc- half double crochet
yarn over, insert hook, yarn over, pull through (three loops on hook), yarn over, pull through all three loops

Materials:Red Heart yarn in your choice of colors
5.0 mm hook (you can use any size hook, as different sizes will produce different results)
embroidery needle
Notes:Keep in mind that different colors are slightly different in thickness and will produce different results, if you want a really tiny flower use a light color (which tends to be thinner) and as small hook, 4.0mm works well.
The final look will also be determined by how tightly or loosely you wind up the flower and secure
Pattern:
  1. Leave long tail (18-24”) and chain 17  Figure A
  2. Skip first space and sc into second space from hook, * ch1 (skipping a space) and sc into next space.  Repeat from* till end.  This will give you 8 holes or spaces  Figure B and Figure C
  3. Turn, into the first three spaces crochet 3sc and 1sl st giving you 3 petals
  4. Into the next 4 spaces crochet 3hdc and 1sl st giving you 4 more petals
  5. Into the last space (the very tip) crochet 1hdc, 2sc and 1sl st.  Fasten off leaving short tail (approx. 4-6”)  Figure D
  6. Insert long tail into embroidery needle and begin to wind up petals to create the rosette.  Stitch together at the bottom as you go along.  I recommend stitching after your first three petals are rounded and then for every additional petal placement so that you can control exactly what your flower will look like.  Figure E1 & E2
  7. Secure with knot when done and leave tails to secure to finished piece.  I use both tails to secure and tie them together and then use the long tail to tack the rosette into place.  Weave in ends and cut short when done.  Figure F
Figure A Figure A


Figure B Figure B

Figure C Figure C

Figure D Figure D


Figure E-1 Figure E-1

Figure E-2 Figure E-2

Figure F Figure F
Medium Rosette
Rosettes Free Pattern on Cre8tion Crochet 011

Abbreviations and Stitches used:
st- stitch
sp- space
ch- chain
sl st- slip stitch
insert hook, yarn over, pull through, (two loops on hook), pull loop closest to hook through other loop
sc- single crochet
insert hook, yarn over, pull through (two loops on hook), yarn over, pull through both loops
hdc- half double crochet
yarn over, insert hook, yarn over, pull through (three loops on hook), yarn over, pull through all three loops
dc- double crochet
yarn over, insert hook, yarn over, pull through (three loops on hook), yarn over, pull through first two loops on hook, yarn over and pull through last two loops

Materials:Red Heart yarn in your choice of colors
5.0 mm hook (you can use any size hook, as different sizes will produce different results)
embroidery needle
  
Notes:
Keep in mind that different colors are slightly different in thickness and will produce different results, if you want a really tiny flower use a light color (which tends to be thinner) and as small hook, 4.0mm works well.
The final look will also be determined by how tightly or loosely you wind up the flower and secure

Pattern:
  1. Leave long tail (18-24”) and chain 25
  2. Skip first space and sc into second space from hook, * ch1 (skipping a space) and sc into next space.  Repeat from* till end.  This will give you 12 holes or spaces  Figure A
  3. Turn, into the first three spaces crochet 3sc and 1sl st giving you 3 petals
  4. Into the next 4 spaces crochet 4hdc and 1sl st giving you 4 more petals
  5. Into the next 4 spaces crochet 5dc and 1sl st giving you 4 more petals
  6. Into the last space (the very tip) crochet 1dc, 1hdc, 2sc and 1sl st.  Fasten off leaving short tail (approx. 4-6”)  Figure B
  7. Insert long tail into embroidery needle and begin to wind up petals to create the rosette.  Stitch together at the bottom as you go along.  I recommend stitching after your first three petals are rounded and then for every additional petal placement so that you can control exactly what your flower will look like.
  8. Secure with knot when done and leave tails to secure to finished piece.  I use both tails to secure and tie them together and then use the long tail to tack the rosette into place.  Weave in ends and cut short when done.

Figure A Figure A Figure B Figure B


Medium Rosettes Free Pattern on Cre8tion Crochet 012
 I hope you enjoyed this FREE Spring Crochet Flower Pattern – Rosettes.  If you like what you see please share it and….
Happy Hookin’
 You may also enjoy

Crochet Flower in a Heart by LORENE

27, 2013
Crochet Flower in a Heart
This crochet flower in a heart is great for adding to any finished product, baby blanket, hat, scarf and makes a great Valentine’s Day pin.  Instructions for making into a pin are at the bottom of the pattern.  Also makes a great Valentine’s Day decoration when used as bunting.
I am proud to say that this heart (according to my testers) is different than the other heart patterns out there and is a unique design that gives great results.  There are many possible variations with this pattern.  Be sure to play around and see what you come up with.
Layered Flower in a Heart free crochet pattern
Materials:
  • Red Heart yarn or any worsted weight yarn
  • 4.0mm crochet hook
  • embroidery needle to weave in ends
Speacial Stitches
Increase- two of the designated stitch per space
Notes:
  • Pattern is written in steps as opposed to rows or rounds
  • You can use any worsted weight yarn for this project but keep in mind that different companies, and even different colors within the same company can have different thickness’ and as such each heart will be slightly different in size.
free crochet pattern layered flower in a heart
Pattern:
Start with a 12” long tail (long tail not needed if you are using heart for bunting or for a pin)
  1. Mc/r with 5sc, join round with sl st
  2. In front loops ONLY sc around increasing in every sp for 10sc
  3. In back loops (be sure to crochet in back loops of the 1st round and not in the back loops of the 2nd round you just crocheted), sc around increasing in every sp for 10sc
  4. In front loops only of the second round, hdc around increasing in every sp for 20hdc
  5. In back loops of second round (again not the 3rd round that you just crocheted) sc around increasing in every sp for 20sc
  6. In front loops only of third round, dc around increasing in every other sp for 30dc
  7. In back loops of the third round, sc around as follows (each space is separated by a comma)
  8. 1sc, 1sc, 1sc, 1sc & 1hdc, 2hdc, 2dc, 2hdc, 1sl st, 1sl st, 1 sl st, 2hdc, 2dc, 2hdc, 1hdc & 1sc, 1sc, 1sc, 1hdc, 1dc, 1hdc, join round with sl st
  9. In both loops crochet around as follows (each space is separated by a comma) 1sc, 1sc, 1sc, 1sc, 1sc, 1sc, 2sc, 1sc & 1hdc, 2hdc, 2dc, 2hdc, 1sl st, SKIP 1, 1sl st, 2hdc, 2dc, 2hdc, 1hdc &1sc, 2sc, 1sc, 1sc, 1sc, 1sc, 1sc, 1sc, 1hdc, 2dc, 1hdc, join round with sl st
  10. Fasten off and weave in end.  Secure center tail and leave long for fastening to finished piece (or weave in if using heart for bunting)  I recommend using  my invisible finish method for a professional look.
*For added stability and finished look one row of sl st can be placed around heart, either in same color or in a different color.
I prefer the way it looks when the sl st is placed in the back loops only.  However if you use this method you should sl st in both loops at the center (indent) part of the heart and do a sc instead at the tip (point) of the heart.
I LOVE these hearts!!!!!
                                        Two toned and all one color both with sl st crochet around edges in back loops only
I hope you enjoyed this free crochet flower in a heart pattern.  For different variations you can do sc’s only in the “flower” portion of the heart, making more of a spiral than a flower as seen here.
Or you can make these hears with embroidery thread and make these adorable
Flower in a Heart Pin
flower in a heart pin free valentines day pattern

Heart motif

416356832_a134d9c063_m.jpg 

I originally made it in Caron SS as something to include in my Gram's care package I sent out. As is, it would make a great embelishment or decoraction on clothes, bags etc or just a little pretty to hang on her granny-mobile (walker with wheels). I also thought that if you made it in cotton it would make a great coaster or even a little scrubbie for the dishes.

I made it up mostly. I started with a standard granny and then made the 'lobes'. I got the idea from a bookmark pattern, but wanted a granny in the middle.
Ok, here goes the 'official' directions:
G hook, ww yarn.
ch 3, join into a circle
round 1:Ch 2, 3 DC, ch 2, (3dc, ch 2) 3 times, join with sl st to ch2. ch 2 and turn
round 2: (2dc, ch2, 3dc in ch2 corner) ch 1, *(3dc, ch2, 3dc, ch1) in remaining 3 corners, join with sl st. ch 4, turn.
Round 3: 11 tr in ch 1 sp, sl st into ch2 corner, sl st in next 2 st and ch1 sp, ch 4, 11 tr in ch 1 sp (both 'lobes' made), sl into ch 2 corner,ch 1, sc around, 2 sc in point, continuing around both lobes, sl in the middle of the two tr clusters to create dip between lobes, join with sl in 1st sc
round 4: rsc in each sc around, join and fasten off.

Monday, February 3, 2014

Square #1
Work 2 rows each in colors D, B and A alternately.
Ch 29.
Row 1 (RS): Skip 2 ch (count as 1 sc), 1 sc into each of next 3 ch, *1 dc into each of next 4 ch; rep from
* to end, turn.
Row 2: Ch 1 (count as 1 sc), skip first st, 1 sc into each of next 3 sts, *1 dc into each of next 4 sts, 1 sc
into each of next 4 sts; rep from * to end working last st into top of tch, turn.
Row 3: Ch 3 (count as 1 dc), skip first st, 1 dc into each of next 3 sts, *1sc into each of next 4 sts, 1 dc
into each of next 4 sts; rep from * to end working last st into top od tch, turn.
Row 4: Rep Row 3.
Rows 5 – 6: Rep Row 2.
Rows 7 – 20: Rep Rows 3 – 6 (3 times); then work Rows 3 and 4 once more. After Row 20, finish off,
weave in ends, block.

Heart Granny Square Crochet Pattern

Heart Granny Square Crochet Pattern

heart granny square crochet pattern
Here’s what you need:
  • 2 colors worsted weight yarn
  • H hook
  • tapestry needle, scissors
Click here to reference the Crochet Abbreviations Chart.
Finished size: approx. 4½ in.

With color A, make a magic ring.
Round 1: Ch 2 (counts as hdc), working into the ring, work 3 hdc, 3 dc, ch 1, Sl st in ring, ch 1, continue working in ring 3 dc, 3 hdc, join — 14 sts (not counting chains).
Round 2: Ch 2 (counts as hdc), work 1 hdc in each of the next 3 sts, 1 dc in next, 2 dc in next, 3 dc in next, ch 1, Sl st in Sl st from previous round, ch 1, 3 dc in next st, 2 dc in next, 1 dc in next, 1 hdc in each of the next 3 sts, join — 20 sts (not counting chains).
Round 3: Working in front loops only, Sl st in each st around, join and fasten off — 20 sts.
Round 4: Join Color B in back loop of the first st after join, ch 2 (counts as hdc), working in back loops only this round, work [1 dc, ch 3, 1 dc] in next st (1st corner made), 1 hdc in next st, ch 2, skip next 2 sts, 1 hdc in next st, [1 hdc, ch 3, 1 hdc] in next st (2nd corner made), 1 hdc in next, ch 2, skip next 2 sts (as well as the Sl st between them), 1 hdc in next, [1 hdc, ch 3, 1 hdc] in next st (3rd corner made), 1 hdc in next, ch 2, skip next 2 sts, 1 hdc in next st, [1 dc, ch 3, 1 dc] in next st (last corner made), 1 hdc in next st, ch 2, join in top of beg ch — 16 sts and 8 ch-sps.
Round 5: Sl st in next st and in ch-sp, ch 3 (counts as dc), work [2 dc, ch 3, 3 dc] in same ch-sp, ch 2, 3 dc in next ch-sp, ch 2, *[3dc, ch3, 3 dc] in next ch-sp, ch 2, 3 dc in next ch-sp, ch 2, rep from *twice more,  join in top of beg ch — 36 sts and 12 ch-sps.
Round 6: ch 1 (d0es not count as st), work 1 sc in same st as join and each of the next 2 sts, 3 sc in ch-sp, 1 sc in each of next 3 sts, 2 sc in ch-sp, 1 sc in each of next 3 sts, 2 sc in ch-sp, *1 sc in next 3 sts, 3 sc in ch-sp, 1 sc in next 3 sts, 2 sc in ch-sp, 1 sc in each of next 3 sts, 2 sc in ch-sp, rep from *twice more,  join — 64 sts.
Fasten off and weave in ends. Block to shape if desired.
blocking granny squares

Looking for more free Valentine’s Day crochet patterns? Click here for more.

Carousel Square by Priscilla Hewitt ©1999

Carousel Square
by Priscilla Hewitt ©1999
Please read my terms of use
Materials:
Worsted weight acrylic yarn (one or 2 colors)
Crochet hook size G
Gauge: Rounds 1-2 = 2 1/2”
Finished size:  6" or 7”
To work front post dc (fpdc): Yo, insert hook from front to back to front
around post of stitch, complete dc.
To work front post sc (fpsc): Insert hook from front to back to front around
post of stitch, complete sc.

Directions are for one color. Two color variation is given after the pattern.
Ch 5, join with a sl st to form ring
Round 1: Ch 4 to count as the first trc, work 15 more trc in the ring; join
with a sl st to the top of the beginning ch 4. (16 trc)
Round 2: Ch 3 to count as the first dc, fpdc around the beginning ch 4 of
round 1; (dc in the next trc, fpdc around the same trc) around; join with a
sl st to the top of the beginning ch 3. (32 sts)
Round 3: Ch 3 to count as the first dc, dc in the same st as joining, fpdc
around the next fpdc; (2 dc in the next dc, fpdc around the next fpdc)
around; join with a sl st to the top of the beginning ch 3. (48 sts)
Round 4: Ch 3 to count as the first dc, dc in the next dc, fpdc around the
next fpdc; (dc in each of the next 2 dc, fpdc around the next fpdc) around;
join with a sl st to the top of the beginning ch 3. (48 sts)
Round 5: Sl st in the next dc, ch 1, fpsc around the next fpdc; (ch 5, fpsc
around the next fpdc) around; join with a sl st to the first fpsc. (16 ch 5
loops)
Round 6: Ch 1, sc in the same st as joining, (5 dc in the next ch 5 loop, sc
in the next fpsc) around, ending with 5 dc in the last ch 5 loop, join with a
sl st to the first sc. (16 shells) (If using 2 colors, fasten off first color.)
Round 7: Ch 1, from the back, sl st into the top of the first fpdc of round 4,
ch 6 to count as the first trc and the first ch 2, skip next 2 dc on round 6, sc
from the front in the next dc, (the center dc of the shell), ch 2, *skip next 2
dc on round 4, trc from the back in the top of the next fpdc of round 4, ch
2, skip next 2 dc on round 6, sc in the next dc, (the center dc of the next
shell), ch 2* Repeat from * to * 14 times; ch 1, join with a sc to the 4th ch
of the beginning ch 6 to form last ch 2 sp. (32 ch 2 sps)
Round 8: Ch 4 to count as the first trc, work 3 more trc in the same sp, *2
dc in the next ch 2 sp, 2 hdc in the next ch 2 sp, (2 sc in the next ch 2 sp)
3 times, 2 hdc in the next ch 2 sp, 2 dc in the next ch 2 sp, 7 tr in the next
ch 2 sp* Repeat from * to * 2 times; 2 dc in the next ch 2 sp, 2 hdc in the
next ch 2 sp, (2 sc in the next ch 2 sp) 3 times, 2 hdc in the next ch 2 sp, 2
dc in the next ch 2 sp, 3 trc in the same ch ch 2 sp as the beginning trcs;
join with a sl st to the top of the beginning ch 4. (84 sts)
Note: For a 6” square, skip round 9 and go to round 10.
For a 7” square, complete both rounds 9 and 10.
Round 9: Ch 3 to count as the first dc, dc in the same st as joining; (dc in
the next 20 sts, 3 dc in the next st) 3 times, dc in the next 20 sts, 2 dc in
the same st as first dc; join with a sl st to the top of the beginning ch 3.
Round 10: Ch 1, 3 sc in the same st as joining; sc in each remaining st
around, working 3 sc in the center st of each corner; join with a sl st to the
first sc. Fasten off. Weave in ends.

The color changes when working this square are a little tricky.
To work the square with 2 colors:
Work round 1 in color A. Attach color B to the top of the joining sl st.
For round 2, ch 2, then work a dc in the same st for the first dc. Work all dc
in color B and all fpdc in color A, changing colors at the top of each st. Join
with a sl st to the first dc. (To change colors at the top of the stitch - work the stitch,
leaving the last 2 loops of the stitch on the hook; new color yo and pull through last 2
loops on hook.)
For rounds 3 & 4: Work all dc in color B and all fpdc in color A, changing
colors at the top of st. Fasten off both colors at the end of row 4.
Round 5: Join color A with a sl st in any fpdc, ch 1, fpsc around the same
fpdc. Finish round 5 as per pattern.
Round 6: Work as for pattern in color A. Fasten off color A at the end of the
round.
Round 7: From the back, join color B with a sl st in the top of the first fpdc of
round 4, finish round as per pattern.
Work rounds 8 and 9 (if desired) as per pattern. Fasten off color B.
Round 10: Attach color A with a sl st in the center st of any corner. Finish
as per pattern.

Sunday, February 2, 2014

Flower brooch by Jessica Felton

Flower brooch

Materials list

Scraps of DK yarn
4mm crochet hook
Darning needle (to work in loose ends)
Pretty buttons
Glue gun
Brooch backs


Notes

This pattern uses American crochet terms. The abbreviations used here are:
Chain – ch
Slip stitch – sl st
Single crochet – sc
Treble – tr
* - shows where a pattern repeat takes place

Row 1:  Make a magic circle, ch 1, work 8 sc into circle and pull tail to close (8 sc)

Row 2:  Sl st into top of 1st sc from the previous row. Ch 1, work 2 sc in each sc around (16 sc)

Row 3:  Sl st into top of 1st sc from the previous row. *Ch 3, sl st into next 2 sc* repeat around (8 3 ch loops)

Row 4:  *Sc into 3 ch loop, ch 1, 3 tr, ch 1, sc* repeat around (8 inner flower petals worked) Sl st into first sc worked and finish off

Row 5: Join second colour to back of flower (see photo) with a sl st *ch 4, st st between base of next two petals* repeat around finishing with a ch 4 and sl st into first sl st worked. (8 4 ch loops)

Row 6: *Sc into 4 ch loop, ch 1, 5 tr, ch 1, sc* repeat around (8 outer flower petals worked) Sl st into first sc worked, finish off and work in loose ends
               
Attach button and glue clasp to back – finished!

Friendship Ring Square (�2000, designed by Terri Kroupa)

Friendship Ring Square
(�2000, designed by Terri Kroupa)

Finished Size:
8" square.
Materials: Worsted Weight Yarn:
     Color A - Windsor Blue
     Color B - Lt. Country Blue
     Color C - Dusty Rose
     Color D - Rose Pink
     Color E - Soft White
Crochet Hook, size H
Pattern Stitch:V-Stitch (abbrev.: V-st): (dc, ch 2, dc) in st indicated.
Directions:
FIRST RING:
With Color A, ch 30; being careful not to twist ch, join with slip st to first ch.
Rnd 1 (right side): Ch 3, dc in same ch and in each ch around; join with slip st to first dc: 30 dc.  Finish off.
SECOND RING:
With Color B, ch 30; holding FIRST RING  with right side facing, and being careful not to twist ch, bring beg ch up through center of FIRST RING; join with slip st to first ch.
Rnd 1 (right side): Work same as Rnd 1 of FIRST RING.
THIRD RING:With Color C, ch 30; holding SECOND RING  with right side facing, and being careful not to twist ch, bring beg ch up through center of SECOND RING; join with slip st to first ch.
Rnd 1 (right side): Work same as Rnd 1 of FIRST RING.
FOURTH RING:
With Color D, ch 30; holding FIRST, SECOND and THIRD RINGS with right side facing, and being careful not to twist ch, bring beg ch up through center of THIRD RING, then bring ch under the FIRST RING and up through the center of FIRST RING; join with slip st to first ch.
Rnd 1 (right side): Work same as Rnd 1 of FIRST RING.
Square:
Rnd 1 (right side): Holding RINGS with right side facing, join soft white with sc in any outer dc of FIRST RING; ch 3, sc in same sp, * (ch 3, sk next dc, sc in next dc) 3 times, sc in next dc, sc in closest dc on next RING; continue working on new RING, sc in next dc, (ch 3, sk next dc, sc in next dc) 3 times; ch 3, sc in next dc; repeat from * twice more; (ch 3, sk next dc, sc in next dc) 3 times; sc in next dc; sc in 7th dc from beg sc on FIRST RING, sc in next dc, (ch 3, sk next dc, sc in next dc) twice, ch 3, join with slip st to first sc.
Rnd 2: Slip st in next ch 3 sp, ch 5, dc in same sp, ch 2, V-st in same sp, skip next sc and ch-3 sp, (V-st in next sc) twice; skip next 2 sc (tr, ch 2, tr) in sp before next sc, skip next 2 sc, (V-st in next sc) twice, skip next ch-3 sp and sc; * in next corner ch-3 sp work (dc, ch 2) three times, dc in same sp, skip next sc and ch-3 sp, (V-st in next sc) twice; skip next 2 sc, (tr, ch 2, tr) in sp before next sc; sk next 2 sc, (V-st in next sc) twice, skip next ch-3 sp and sc; repeat from * twice more; join with slip st to 3rd ch of beg ch-5.
Rnd 3: Slip st in next ch-2 sp, dc and next corner ch-2 sp; ch 3, (2dc, ch 2, 3dc) in same sp; (3dc in between next 2 V-st) twice, skip next 2 tr, 3dc before next V-st, (3dc in between next 2 V-st) twice; skip next V-st; *(3dc, ch 2, 3dc) in corner ch-2 sp, (3dc in between next 2 V-st) twice, skip next 2 tr, 3dc before next V-st, (3dc in between next 2 V-st) twice; skip next V-st; repeat from * twice more; join with slip st to top of beg ch-3.
Rnd 4: Ch 1; sc in same st as joining and in next 2 dc, * (2sc, ch 2, 2dc) in corner ch-2 sp, sc in each dc across; repeat from * around; join with slip st to first sc.

"Flat Braid" Square Joining Method

"Flat Braid" Square Joining Method
Directions for this simple square follow the joining illustrations
by Priscilla Hewitt

1. (Ch 3, skip next st, sc in the next st)  all around
first square, working (ch 3, sc) 2 times in each corner.


2. Second square - Work as for first square on two
sides, stopping at one sc in a corner.


3. Ch 2, drop yarn, insert hook from top into any corner
on the first square


4. Pick up dropped stitch


5. Pull st up through corner space on first square


6. Ch 1, sc in the same corner space on the second square


7. Ch 2, drop stitch, insert hook from the top into
the next ch-3 space on the first square


8. Pick up dropped stitch


9. Pull stitch up through ch-3 space on the first square


10. Ch 1, skip next st on the second square, sc in
the next st on the second square


11. Repeat steps 7-10 across, then repeat steps
3-6 for corner. Continue working (ch 3, skip next st,
sc in next st around last side of second square.
Fasten off.


12. Join third square to the second square in the same way.


13. To join fourth square, work step 2 along one side only,
then join the next side to the third square, and the following side
to the first square, finishing last side as in step 11.

Seraphina's Shawl by Doni's Stuff

NOTE: Once the beginning wedge is made, you will increase in the same places, in the same sequence, until the shawl is as large as you like. That’s what makes this shawl such a great little bit of hand-candy. You will increase at the beginning of each edge, and on either side of the ‘point’ in the middle, and at the end of each row. Between those two increase points on each side, the working is the same, no matter how many repititions you have. A typical shawl, finished, has a long side of about 25 shells, not counting the point. 

Once you can get the sequence memorized, this goes VERY quickly. 

To begin: 

Chain 6, join to form a ring. 

Row 1 (below): Chain 4 (counts as first dc and ch-1), dc, ch 1, (3 dc, ch 2, 3 dc)-shell made-, ch 1, dc-ch 1-dc (V-stitch made). Ch 4, turn.
 
Row 1 

Row 2 (below): dc in same stitch as turning. (beg V-stitch made), ch 1. Dc in next ch-1 space, *dc in each of next 3 dc, dc in ch-2 space of previous shell. ch 1*, (3 dc, ch 2, 3 dc) in same ch-2 space (shell in shell at point), ch 1. Dc in same space. Repeat from * to * once, then V-stitch in 3rd chain of beg chain from previous row. 
   
Row 2 

Row 3 (below): ch 4, dc in same stitch as turning. Ch 1, dc in next ch-1 space, dc in each of next 2 dc, (dc, ch 1, dc) in next dc, dc in each of next 2 dc, dc in next ch-1 space, ch 1, shell in shell, ch 1, dc in next ch-1 space, dc in each of next 2 dc, (dc, ch 1, dc) in next dc, dc in each of next 2 dc, dc in next ch 1 space, ch 1, (dc, ch 1, dc) in 3rd chain of starting chain from previous row. 
 
Row 3 

Row 4 (below): ch 4, dc in same st as turning,* ch 1, dc in next ch 1 space. Dc in next 3 dc, ch 1, skip next dc, (dc, ch 2, dc)in ch-1 space of v-stitch of previous row, ch 1, dc in next 3 dc, dc in ch-1 space. Ch 1*, shell in shell, repeat from * to * once. V-stitch in 3rd chain of beginning ch from previous row. 
 
Row 4 

Row 5 (below): ch 4, dc in same stitch as turning. * ch 1, dc in ch-1 space, dc in next 4 dc, ch-1, skip next st. work (2 dc, ch 1, 2 dc) in ch-2 space of V-stitch of previous row. Ch 1, skip next dc, dc in each of next 4 dc, dc in ch-1 space. Ch1*, shell in shell, repeat from * to * once. 
 
Row 5 

Row 6 (below): ch 4, dc in same stitch as joining, *ch 1, dc in ch-1 space, dc in next 5 dc, skip next 2 dc, ch 1, work (2dc, ch 2, 2dc) in ch 1 space of V-stitch of previous row, ch 1, skip next dc, dc in each of next 5 dc, dc in ch-1 space, ch 1 *, shell in shell, repeat from * to * once.
 
Row 6 

 
Row 7 

(sequence row 1) Row 7 (above): ch 4, dc in same stitch as turning, * ch 1, dc in ch-1 space, dc in each of next 2 dc, (dc, ch 1, dc) in next dc {Note: this V-stitch starts a new shell sequence}. Dc in each of next 3 dc (from this point on, you will always dc in these dc, never increasing. This will become the 3-dc rib between shells), skip next 2 dc, ch 1, make (3dc, ch 2, 3 dc)shell in ch-2 space of v-stitch of previous row (NOTE: from this point on, you will make a [3dc, ch 2, 3 dc] shell-in-shell in this shell.) Ch 1, dc in each of next 3 dc (again, from this point on, you will always dc in these dc, never increasing. This will become the 3-dc rib between shells.) (dc, ch 1, dc) in next dc. Dc in each of next 2 dc, dc in ch-1 space.* Shell in shell at point. Repeat from * to * to end of row. 

 
Row 8 

(sequence row 2) Row 8: ch 4, dc in same stitch as turning. *ch1, dc inch-1 space, dc in each of next 3 dc, skip next dc, ch 1, (dc, ch 2, dc) in V-stitch. Ch 1, dc in each of next 3 dc (you will dc in each of next 3 dc here from now on), shell in shell, dc in each of next 3 dc, ch 1, (dc, ch 2, dc) in V-stitch, ch 1, dc in each of next 3 dc, dc in ch-1 space.* Shell in shell at point. Repeat from * to * to end of row. 

 
row 9 

(sequence row 3) Row 9 (above): ch 4, dc in same stitch as turning. * ch 1, dc in ch-1 space, dc in each of next 4 dc, skip next dc, ch 1, (2dc, ch 1, 2dc) in V-stitch. Ch 1, dc in each of next 3 dc, shell in shell, dc in each of next 3 dc, ch 1, (2dc, ch 1, 2dc) in V-stitch, ch 1, dc in each of next 4 dc, dc in ch-1 space.* Shell in shell at point. Repeat from * to * to end of row. 

 
Row 10 

(sequence row 4) Row 10 (above): ch 4, dc in same stitch as turning. * ch 1, dc in ch-1 space, dc in each of next 5 dc, skip next dc, ch 1, (2dc, ch 2, 2dc) in V-stitch. Ch 1, dc in each of next 3 dc, shell in shell, dc in each of next 3 dc, ch 1, (2dc, ch 1, 2dc) in V-stitch, ch 1, dc in each of next 5 dc, dc in ch-1 space.* Shell in shell at point. Repeat from * to * to end of row. 
 
Row 11 

(sequence row 1) Row 11 (above): ch 4, dc in same stitch as turning. * ch 1, dc in ch-1 space, dc in each of next 2 dc, (dc, ch 1, dc) in next dc. Dc in each of next 3 dc, skip next 2 dc, ch 1, shell (3dc, ch 2, 3 dc) in next ch-2 space. (from this point on, you will shell-in-shell here). Ch 1, dc in each of next 3 dc. Ch 1, shell in shell, ch 1, dc in each of next 3 dc, (dc, ch 1, dc) in next dc. Dc in each of next 2 dc, dc in ch-1 space.* Shell in shell at point. Repeat from * to * to end of row. 

Row 12, repeat sequence row 2, increasing only in the four 'increase' points. (Refer to note below and pictures) 

Row 13, repeat sequence row 3. 

Row 14, repeat sequence row 4. 

Repeat the four sequence rows from this point on, making sure to increase at the beginning of each row, on either side of the point, and at the end. Those are the ONLY places you will increase. Once the shell sequence is completed, shells will ALWAYS have a shell in them, and the 3-dc ribs between shells will ALWAYS be 'dc in each of next 3 dc'. If you remember this, and always keep the increases in the right places, you will be able to make this shawl very easily. Notice that you are increasing in the ch-1 space at the beginning of the row, right before the point, right after the point, and in the ch-1 space at the end of the row. Between those points, you are making shell sequences and 3dc ribs. Those will not change. 

A usual shawl on a size H hook will be about 25 shells on each side. 

Once your shawl is the desired length, at the end of the last row, ch 1, then turn and work along the LONG edge. Spaced evenly, work sc across edge to make it look ‘finished’. You can also work along the shelled edges in this way, but I choose not to… most of the time! 

I hope that these instructions help you to create beautiful shawls for many years to come. 

A side note, I’ve found that for a quick, wonderfully warm and cuddly shawl, a size N hook and 4 skeins of Lion Brand Homespun work very well. There will be yarn left over, which I use to fringe the shawl, and also to crochet a snood to match it. 

Enjoy!