Friday, January 31, 2014

Danish Heart Crochet Pattern

free danish heart crochet pattern

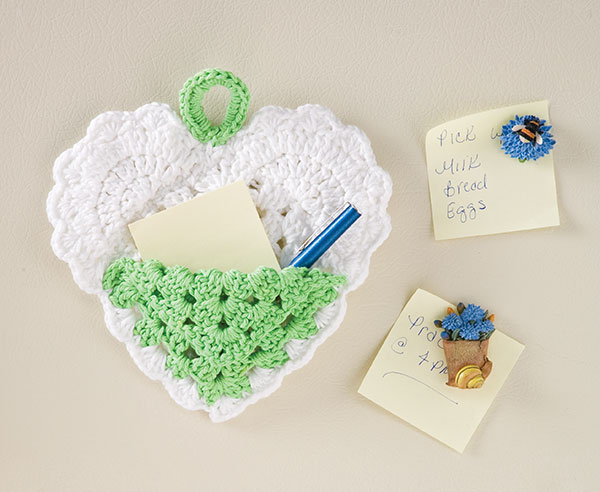
The Scandinavian blood in me responds quite strongly to the colors and pattern of the Danish Heart. The simplicity and ingenuity of the pattern is stunning. Two ovals of contrasting colors, folded in half with strategic slits, when woven together produce a charming checkerboard heart that becomes a little basket. Brilliant! Thank you Hans Christian Andersen!
Recently, I saw in a magazine the pattern for a knit version of the Danish Heart and my own heart did several palpitations.  A Danish Heart in YARN?? So absolutely fabulous!! However, the pattern required sewing knit pieces together BEFORE you even got to the weaving of the heart. Sorry, but excessive piecing and joining makes me eventually hate the project that I set out so excitedly to make.
before…….and after blocking
Knowing that I could crochet a flat oval quite easily, I figured out how to incorporate the necessary slits into the pattern so that when the oval is completed WITH ONE PIECE OF YARN the piece is ready to weave. Yay! So easy!

Danish Heart Crochet Pattern

Suggested Yarn and Crochet Hook Size
Fingering Weight + size C/2 – 2.75mm hook
DK Weight + size F/5 – 3.75mm hook
Worsted Weight + size H/6 – 5.00mm hook
Gauge is not important for this project – just make sure that your crochet is nice and tight. Adjust crochet hook size smaller if necessary.
US Crochet Terms
beg: beginning
ch(s): chain(s)
sc: single crochet
st: stitch
sl st: slip stitch
Make 2 Ovals – one in red, one in cream
Ch 30.
Round 1: Sc in 2nd ch from hook. Sc in the next 27 ch. 3 sc in the last ch. Crocheting along the opposite side of the foundation ch, sc in the next 28 ch. 3 sc in the skipped ch from the beg. Sl st in beg sc.
Round 2: Ch 1. Sc in same st. Sc in the next 27 sc. 2 sc in the next 3 sc. Sc in the next 28 sc. 2 sc in the last 3 sc. Sl st in beg sc.
Round 3: Ch 1. Sc in same st. Ch 26. Taking care to not twist your chain, skip 26 sc and sc in next sc. (2 sc in next sc. Sc in next sc.) 3 times. Sc in next sc. Ch 26.Taking care to not twist your chain, skip 26 sc and sc in next sc. (2 sc in next sc. Sc in next sc.) 3 times. Sl st in beg sc.
Round 4: Ch 1. Sc in same st. Sc in the next 26 ch. Sc in the next sc. (Sc in the next 2 sc. 2 sc in the next sc.) 3 times. Sc in the next st. Sc in the next 26 ch. Sc in the next sc. (Sc in the next 2 sc. 2 sc in the next sc.) 3 times. Sl st in beg sc.
Round 5: Ch 1. Sc in same st. Sc in the next 27 sc. (2 sc in next sc. Sc in the next 3 sc.) 3 times. Sc in the next 28 sc. (2 sc in next sc. Sc in the next 3 sc.) 3 times. Sl st in beg sc.
Round 6: Ch 1. Sc in same st. Sc in the next 27 sc. (Sc in the next 2 sc. 2 sc in the next sc. Sc in the next 2 sc.) 3 times. Sc in the next 28 sc. (Sc in the next 2 sc. 2 sc in the next sc. Sc in the next 2 sc.) 3 times. Sl st in beg sc.
Round 7: Ch 1. Sc in the same st. Sc in the next 27 sc. (Sc in the next 5 sc. 2 sc in the next sc.) 3 times. Sc in the next 28 sc. (Sc in the next 5 sc. 2 sc in the next sc.) 3 times. Sl st in beg sc.
Leaving an 18” tail, break yarn and knot.
Make 1 Strap in Red
Leaving an 18″ tail, ch 31.
Row 1: Sc in 2nd ch from hook. Sc in each ch to end. (30 st)
Row 2 – 4: Ch 1, turn. Sc in each sc across to end. (30 st)
Leaving an 18″ tail, cut yarn and knot.
Assembly
Making sure that the ending tails of yarn on the red and cream ovals are turned towards the outside, fold in half with right sides facing. Position ovals and weave them together using the following illustration as a guide. Use the tails of yarn to sew the heart together in the places indicated. Using the long tails on the strap, sew the strap on the inside of the heart to form a handle in the places indicated. Weave in ends.

Heart Pocket Note Holder

Heart Pocket Note Holder

Click here for larger image.Crochet this darling Heart Pocket Note Holder to leave love notes for those who matter to you. This is a practical way to keep organized with the added bonus that it is a fun and charming design. Handmade gifts are as great to give as they are to receive, and this is a quick and easy project that will have you repeatedly making it for special friends and loved ones of all ages.
Design by Terry Day

Skill Level

Easy

Finished Size

8 1/4 inches at widest part x 8 inches long

Materials

  • Elmer-Pisgah Peaches & Creme medium (worsted) weight cotton yarn (21/2 oz/122 yds/71g per ball):
    • 1 1/2 oz #1 white
    • 1 oz #51 apple green
  • Size F/5/3.75mm crochet hook or size needed to obtain gauge
  • Tapestry needle
  • Fabric glue
  • Magnets (optional)

Gauge

Rnds 1 & 2 = 2 1/2 inches across

Pattern Notes

Weave in ends as work progresses.
Join rounds with a slip stitch unless otherwise stated.
Chain-3 at beginning of double crochet round counts as first double crochet unless otherwise stated.

Instructions

Square

Make 2 white and 1 apple green.
Rnd 1 (RS): Ch 4, join in first ch to form a ring, ch 3 (see Pattern Notes), 2 dc in ring, ch 2, [3 dc in ring, ch 2] 3 times, join (see Pattern Notes) in 3rd ch of beg ch-3. (12 dc, 4 ch-2 sps)
Rnd 2: Sl st in each of next 2 dc, sl st in next ch-2 sp, ch 3, in same ch-2 sp work (2 dc, ch 2, 3 dc) (beg corner), ch 1, [in next ch-2 sp work (3 dc, ch 2, 3 dc in same ch-2 sp (corner), ch 1] 3 times, join in 3rd ch of beg ch-3. (24 dc, 4 ch-1 sps, 4 ch-2 sps)
Rnd 3: Sl st in each of next 2 dc, sl st in next ch-2 sp, beg corner in same ch-2 sp, *ch 1, 3 dc in next ch-1 sp, ch 1, corner in next ch-2 sp, rep from * twice, ch 1, 3 dc in next ch-1 sp, ch 1, join in 3rd ch of beg ch-3. (36 dc, 8 ch-1 sps, 4 ch-2 sps)
Rnd 4: Sl st in each of next 2 dc, sl st in next ch-2 sp, beg corner in same ch-2 sp, *ch 1, [3 dc in next ch-1 sp, ch 1] twice, corner in next ch-2 sp, rep from * twice, ch 1, [3 dc in next ch-1 sp, ch 1] 2 times, join in 3rd ch of beg ch-3, fasten off. (48 dc, 12 ch-1 sps, 4 ch-2 sps)

Circle

Make 2.
Rnd 1 (RS): With white, ch 4, join in first ch to form ring, ch 3, 12 dc in ring, join in 3rd ch of beg ch-3. (13 dc)
Rnds 2 & 3: Ch 3, dc in same st as joining, 2 dc in each dc around, join in 3rd ch of beg ch-3. At end of last rnd, fasten off. (52 dc at end of last rnd)

Assembly

Fold each Circle in half with RS facing. Place 2 white Squares tog; working through both thicknesses, sew fold of 1 Circle to edge of Squares stretching Circle slightly to fit if necessary. Rep for other Circle on adjoining side of Squares.

Edging

Place WS of apple green Square over RS of 1 white square, carefully matching sts. Working through all 3 thicknesses, join white in ch-2 sp at bottom corner Squares, ch 2, 5 hdc in same ch-2 sp, *sk next dc, sc in next dc, sk next dc, 6 hdc in next ch-1 sp, rep from * twice, sk next 3 dc, sc in next corner ch-2 sp, working through both thicknesses of Circles only, sk first dc,** 6 hdc in next dc, sk next dc, sc in next dc, sk next dc, rep from ** around, adjusting sts if necessary to have 7 (6-hdc) groups on each Circle and sc in st between Circles, working through thicknesses of all 3 Squares, sc in next corner ch-2 sp, sk next 3 dc, *6 hdc in next ch-1 sp, sk next dc, sc in next dc, sk next dc, rep from * twice, join in 2nd ch of beg ch-2, fasten off.

Hanger

Join apple green in sc between 2 Circles, ch 18, join in same sc to form a ring, ch 1, sc evenly in ring covering ch sts completely and keeping sts smooth and flat, being careful not to bunch them up, join in first sc, fasten off.

Finishing

Fold down top half of apple green Square to form flap for pocket. Tack down outer corners of flap pocket where it folds to keep it from falling forward when the notepad and pen are placed inside.
For added strength, add a dot of glue to the base of Hanger on WS where Hanger touches Heart.
If using magnets, glue to WS of Heart.
Copyright © 2008 Quick-Stitch Crochet, American School of Needlework. All rights reserved

Crocheted Gingerbread Man Cookie Pattern


No need to worry about putting on extra weight during the holidays we these calorie-free crocheted gingerbread man cookies! Great as an appliqué, ornament, or holiday decoration. String them together for some gingerbread garland! Or sew two together and stuff with a little poly-fil to make a little stuffed toy. Finished gingerbread man measures approx. 3.5" x 2.5". 

Materials:
- Worsted weight yarn in brown and white. I used Lion Brand Vanna's Choice in Honey which is a great gingerbread color!
- Size G (4.00mm) Crochet Hook (or larger if you wish to make larger gingerbread men)
- Tapestry needle
- Small pom-poms for eyes and buttons and a little piece of red yarn for the smile.

Abbreviations:
DC = Double Crochet

Gingerbread Man Cookie Pattern

First lets make the body...
Magic ring, ch 2, make 10 DC in ring, join to first DC, chain 7

DC in 3rd chain from hook and in next 4 chains, (now you are back to your 10 DC round) skip one stitch and join to the next DC stitch, chain 7
DC in 3rd chain from hook and in next 4 chains, (now you are back to your 10 DC round) skip one stitch and join to the next DC stitch, chain 5
DC in 3rd chain from hook, and in next 2 chains, (now you are back to your 10 DC round) skip one stitch and join to next DC stitch.
Slip stitch in next two stitches.
Chain 5, DC in 3rd chain from hook, and in next 2 chains, (now you are back to your 10 DC round) skip one stitch and join to next DC stitch (this should be the same DC as where you started the first leg)
Fasten off and weave in ends.
Now make the head...
Magic ring, ch 2, make 12 DC in ring, join to first DC, fasten off and weave in ends.

Attach circle (head) to body with tapestry needle.

Surface slip stitch around entire edge if body. HERE is a great tutorial on how to make surface slip stitches.

Glue or stitch on face and button embellishments if desired.
I used small pom-poms from Craftprojectideas.com for the eyes and buttons. They came in this package of Rainbow Assorted Poms. You can find them HERE or at Walmart stores. I glued them on along with a small piece of red yarn for the mouth. You could stitch on a smile or crochet small buttons and eyes as well. 
- See more at: http://www.repeatcrafterme.com/2013/11/crocheted-gingerbread-man-cookie-pattern.html#sthash.6S5TZAh9.dpuf

Mini Wreath Ornament © June Gilbank 2013

Not ready to make it yet? Add it to your Ravelry queue: 

Terminology

chchain
scsingle crochet (double crochet for UK/Aus)
sl stslip stitch (single crochet for UK/Aus)
ststitch

You will need…

  • H US/5mm crochet hook
  • Small quantity of worsted weight yarn in one or two shades of green, and red (or colours as desired!)
  • Yarn needle to weave in ends

Size

Approx 3″ (8cm) diameter. (Your gauge and yarn choice will affect the finished size slightly.)

Gauge

Gauge is unimportant for this pattern. I like to crochet the wreath with a larger hook than I’d use for amigurumi – the looser stitches prevent the wreath from becoming too rigid. Use the recommended hook size on your yarn’s ball band as a starting point.

Notes

As the foundation chain won’t be visible, you can crochet into whichever loops you find easiest. (You’ll probably find that working into the top loop of the chain is fastest!)

Colour Code

Adark green (or any colour of your choice)
Bmedium green (or any colour of your choice)
Cbright red (or any colour of your choice)

Leaf Spiral (make 2)

With A, ch 36, sc in 2nd ch from hook,
*ch 2, (sc, ch 2, sc) in next st, ch 2, sc in next st;
repeat from * until last ch.
As you crochet, your work will automatically curl up into a ruffled spiral. Fasten off, leaving a long yarn end, and set aside.
mini wreath ornament crochet pattern by planetjune
Repeat with B to make the 2nd spiral.
Lay the two spirals next to each other with the yarn tails at the same end. Hold this end of both spirals together and begin to twist the two spirals around each other.
Note: If you hold one spiral still and twist the other around it, you may end up with one stretched more than the other, and the bottom ends wouldn’t match up as one would be longer than the other. To prevent this and keep them even, it’s best to lift A over B, then lift B over A, and keep alternating in this way to interlace them all the way along.
mini wreath ornament crochet pattern by planetjune
Continue twisting the spirals together all the way along their length, until they are joined into one long ruffled cylinder.
Bring the ends of the cylinder together to form a ring shape. Using a yarn needle and the long yarn end from each yarn, stitch the ends of each spiral together. Don’t worry if it’s not 100% invisible – the bow will cover it!
mini wreath ornament crochet pattern by planetjune
Weave in all yarn ends by passing them along the centre of the wreath spiral, where they won’t be seen.

Bow

With C, ch 36. Fasten off, leaving a long yarn end.
Form ‘rabbit ears’ with the chain around your forefingers:
mini wreath ornament crochet pattern by planetjune
…and tie in a loose bow:
mini wreath ornament crochet pattern by planetjune
Tweak the loops and ends so the loops are nice and round and everything looks fairly even – it doesn’t have to be perfect! – then pull carefully to tighten the knot.
mini wreath ornament crochet pattern by planetjune
Flip the bow over so you’re looking at the backs of the chains. Using a yarn needle, weave each yarn end up through the back bumps of the chain to the knot. Trim the starting yarn end.
To secure the bow (so it won’t come undone if someone pulls on the ends), use the long yarn end and wiggle the yarn needle all the way through the knot from the back to the front, then make a second stitch to the back again.
mini wreath ornament crochet pattern by planetjune
Decide whether you’d like the bow at the top or bottom of the wreath, and position the wreath so the join will be hidden beneath the bow. Stitch the bow in place, then weave in the remaining yarn end.

Options

  • Stitch or glue small beads or sequins onto the wreath to represent holly berries or miniature baubles.
  • For a faster wreath, omit the crocheted bow and instead tie a bow from a short length of ribbon.
mini wreath ornament crochet pattern by planetjune
I hope you enjoy this pattern. Please leave me a comment below if you do, and consider leaving me a donation. Thanks!

Thursday, January 30, 2014

Geez Louise

By Melissa Mall 

Geez Louise

Model and Photos: Melissa Mall
Difficulty: Intermediate
Every now and again I feel like I’ve seen all there is to see in the land of crocheted hats. Despite everything you can do with color and stitch patterns, there are only so many shapes something can be and still go on your head.
Imagine my delight when I stumbled on a variation on the theme of ‘hat’ that was new to me. Geez Louise is a cross somewhere between a cloche, a watch cap, and a turban, with loads of feminine attitude and an attractive stitch pattern to boot. The gathered part can be worn to the front, to the side, or in between to allow you to change up your look even more.
Size: One Size
Finished Measurements: 10 1/5 inches from crown to brim, 22 inch circumference
Materials:
  • Cascade 220 Wool [100% Wool; 220yd/201m per 100g/3.5oz skein]; color: Tangerine; 1 skein
  • I/9 (5.50mm size) hook
  • Tapestry Needle
Gauge: 13 sts/15 rows = 4″/10cm in patt.
Directions:
Rnd 1: Ch 2; make 12 sc in 2nd ch from hook. (12 sc)
Rnd 2: *Sk 1 st, make 2 sc in next st. Repeat from * around. (12 sc)
Rnd 3: Make 2 sc in each sc around. (24 sc)
Rnd 4: *Sk 1 st, make 3 sc in next st, sk 1 st, make 2 sc in next st. Repeat from * around. (30 sc)
Rnd 5: *Sk 1 st, make 3 sc in next st, sk 2 sts, make 3 sc in next st. Repeat from * around. (36 sc)
Rnd 6: *Sk 1 st, make 3 sc in next st, [sk 1 st, make 2 sc in next st] 2 times. Repeat from * around. (42 sc)
Rnd 7: *Sk 1 st, make 3 sc in next st, sk 2 sts, make 3 sc in next st, sk 1 st, make 2 sc in next st. Rep from * around. (48 sc)
Rnd 8: *Sk 1 st, make 3 sc in next st. [Sk 1 st, make 2 sc in next st] 3 times. Repeat from * around. (54 sc)
Rnd 9: *Sk 1 st, make 3 sc in next st, sk 2 sts, make 3 sc in next st. [Sk 1 st, make 2 sc in next st] 2 times. Rep from * around. (60 sc)
Rnd 10: *Sk 1 st, make 3 sc in next st. [Sk 1 st, make 2 sc in next st] 4 times. Repeat from * around. (66 sc)
Rnd 11: *Sk 1 st, make 3 sc in next st, sk 2 sts, make 3 sc in next st. [Sk 1 st, make 2 sc in next st] 3 times. Rep from * around. (72 sc)
Rnd 12: *Sk 1 st, make 3 sc in next st. [Sk 1 st, make 2 sc in next st] 5 times. Repeat from * around. (78 sc)
Rnds 13-22: *Sk 1 st, make 2 sc in next st. Repeat from * around. (78 sc)
Rnd 23: Ch 4. Sk 5 sts, make 2 sc in next st. *Sk 1 st, make 2 sc in next st. Repeat from * around. (78 sts)
Rnds 24-40: *Sk 1 st, make 2 sc in next st. Repeat from * around. (78 sc)
Sl st in next st; finish off leaving a tail of yarn about 6 inches long.
Tie
Row 1: Ch 11, sc in 2nd ch from hook and each ch across. (10 sc) Turn.
Rows 2-4: Ch 1, sc in each st across. (10 sts) Turn.
Row 5: Ch 1, sc in each st across. (10 sc) Finish off.
Finishing: To finish, thread tail left at the end of the hat through the needle. Weave yarn through section of hat between brim and the hole created in Rnd 23. Pull to gather fabric.
Thread Tie through hole and around gathered section. On wrong side of hat, sew the short ends of the Tie together. Also on wrong side, sew the hole closed. To finish, weave in all ends.

SUZETTA'S HEART PIN

Monday, April 23, 2007

SUZETTA'S HEART PIN


Sherry, from Virginia, emailed me that she had made over 100 of my hearts in VA Tech colors for anyone who wanted them. That's when I realized I had never posted the pattern to my blog.

So here is the pattern for anyone who wants to make them to share with those needing a little love.


HEART PIN INSTRUCTIONS


Materials:
Small amount of worsted weight yarn
G (4.5mm) or H (5.0mm) crochet hook
3/4 inch pin back
Needle and thread to match or hot glue


Small Heart Motif

Chain 4, make all stitches in the first chain. 3 trc, 3 dc, chain 1, 1 trc, chain 1, 3 dc, 3 trc, chain 2 slip stitch. Fasten off.

Sew or glue pin back to back of heart. Embellish with ribbon or yarn bow.

Large Heart Motif


Round 1: Chain 4, make all stitches in the first chain. 3 trc, 3 dc, chain 1, 1 trc, chain 1, 3 dc, 3 trc, chain 2 slip stitch.


Round 2. Chain 3, in first trc make sc and hdc, in next stitch 3 hdc, in next stitch 2 hdc, 1 sc in next four stitches, chain1 dc in trc chain 1, sc in next four stitches, 2 hdc in next stitch, 3 hdc in next stitch, hdc and sc in next stitch, chain 3 and slip stitch in joining. Fasten off.

Sew or glue pin back to back of heart. Embellish with ribbon or yarn bow.

Heart


Chain 4, then (without doing a slip stitch) work all the round in the first chain 3 tr, 3 dc, 1 ch, 1tr, 1ch, 3dc, 3tr. 3 chains Sl st in the centre, fasten off.


If you ever need help with conversion, this is an easy chart I made.


Breast Cancer False Breast


With a G Hook and Worsted weight yarn:
Note: At the end of each round, join with a sl st to first sc and ch 1.
1. Sc 6 in magic loop.
2. sc around
3. In flo, 2 sc in ea around
4. (sc, 2 sc) around
5. (sc 2, 2 sc) around
6. (sc 3, 2 sc) around
7. sc around
8. (sc 4, 2 sc) around
9. (sc 5, 2 sc) around
10. (sc 6, 2 sc) around
11. (sc 7, 2 sc) around
12-14. sc around
15. In BLO, (sc 7, dec) around
16. (sc 6, dec) around
17. (sc 5, dec) around
18. (sc 4, dec) around
19. (sc 3, dec) around
20. (sc 2, dec) around
21. (sc, dec) around. Stuff.
22. dec around. Fasten off, leaving long tail.
Sew long tail through remaining loops. With same long tail, sew through both pieces loosely so that the back is slightly concave.
Makes approximately a A cup. Add increase rows and rows between 12 and 14 to make larger cup sizes.